Lab 2: Build the RPA Process
Now that Audrey has submitted her design and recordings of how the data entry task is performed, it’s time for Steven to get to work on building the bot!
The process is promoted to the build phase in a few clicks (we’ve done that for you here), and in doing so, bot actions are auto-generated.
In this lab, you will review those generated steps, as well as some newly configured by Steven. You’ll also have the opportunity below to configure some of your own bot actions to finish the process!
You will be provided a virtual machine (VM) that is pre-configured with RPA Builder installed. Your instructor will guide you on creating a Remote Desktop Session to log in to the VM. From there, follow the instructions below in RPA Builder. |
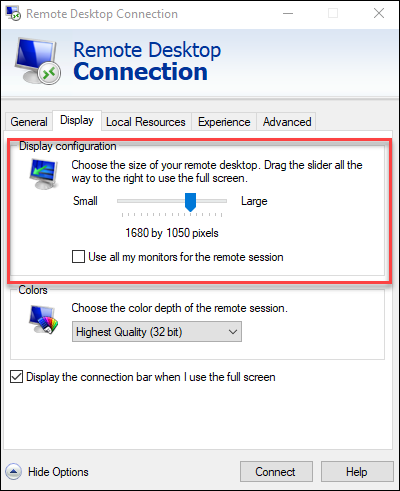
Ensure your RDP Connection display settings are set to the resolution of 1680 x 1050. |
Open and Review the Imported RPA Process
Open MuleSoft RPA Builder
-
Open Mulesoft RPA Builder by clicking on the desktop icon
-
If it is your first time opening RPA Builder, the connection dialog shows automatically.
-
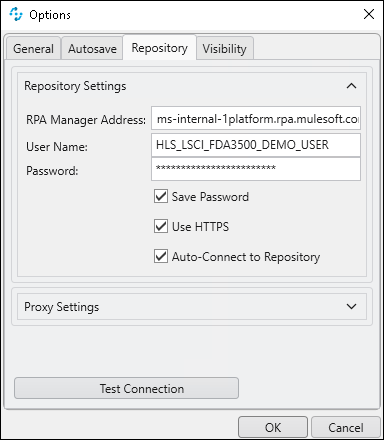
If the dialog does not show, click in the top menu bar on Options > Repository
-
-
Your instructor will provide credentials to connect RPA Builder to the RPA Manager repository.
-
Click Test Connection and ensure the test succeeds. If the test fails, double-check the input information and/or flag to your instructor.
-
Click OK
Add a Re-Usable Activity from the Activity Library
Once the process is imported, notice that the same BPMN diagram shows up in the top window. This was imported from the original design submitted by Audrey!
Review the Current Process
-
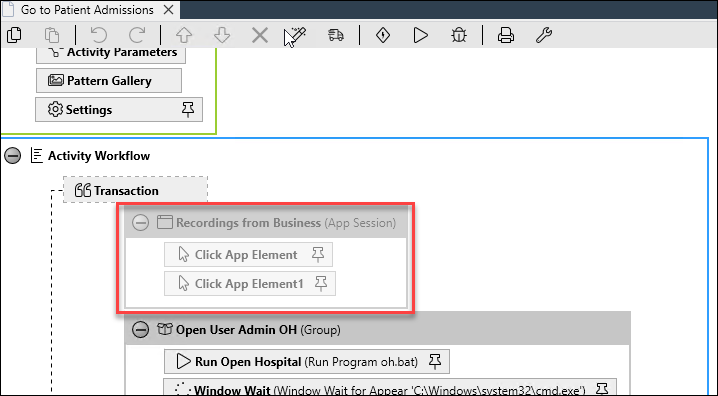
Double click on the first BPMN process node called Go to Patient Admissions. RPA Manager loads the workflow in the Worfklow Editor window below.
-
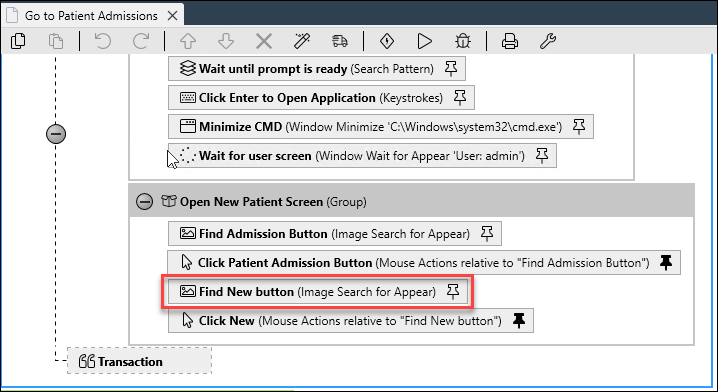
Expand the group titled Recordings from Business. This group contains actions that hold the screenshots that were captured during design! As an automation builder, this speeds up our understanding of what needs to be built. Double-click an action to open and review. These steps are disabled, as they are only for reference.
-
Scroll down and double click on the action titled Find New Button.
-
This action uses computer vision to find images and text automatically on the screen. In this case, it is looking for the button with a label "New" and will dynamically capture the screen coordinates of wherever this button is found. You will configure your own image search in another step in this Lab!
-
Click Cancel when you’re finished reviewing.
-
-
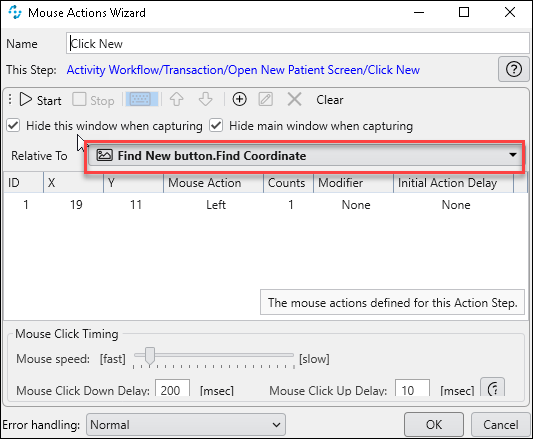
Double-click on the Click New action.
-
Note that this mouse action performs an automated mouse click (Left click). How does it know where to click? The coordinates found in the previous step are passed as an input to this step! This way, the mouse click dynamically moves to wherever the "New" button is found on the screen. We can adjust speed, click delays and more all in this simple dialog configuration. Close the Mouse Actions Wizard when you’re done reviewing.
-
Add Cleanup Step from Activity Library
A common need in RPA processes is to ensure all applications and windows are closed after the execution is complete. We want to teach our bots to clean their workspace when they are done, so they don’t leave a mess for the next execution! This can cause unexpected errors. Since we’ve just imported this process from the business, they
-
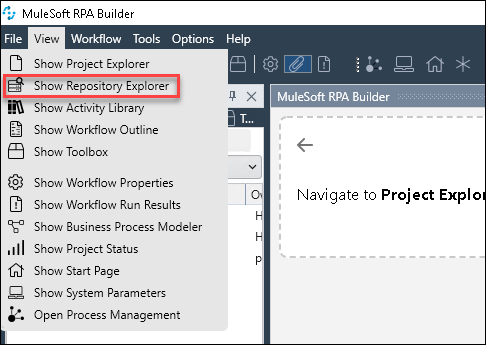
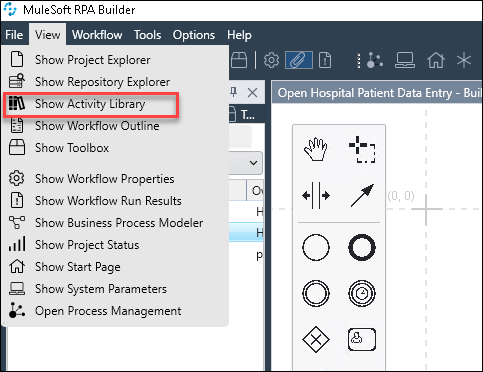
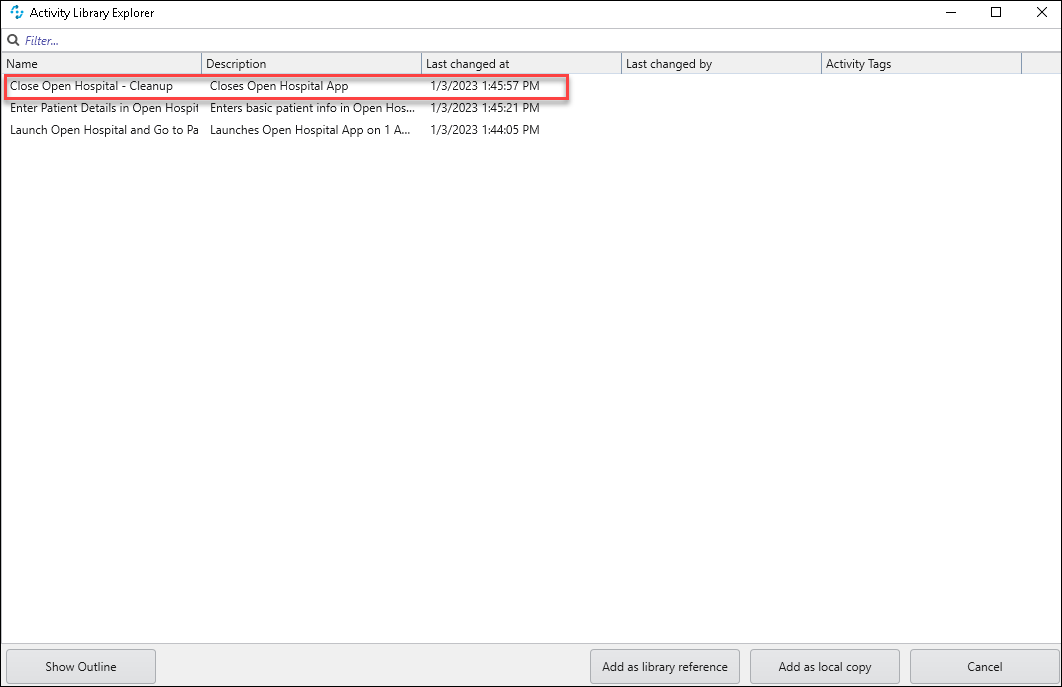
Click on View > Show Activity Library to open the Activity Library. Note there is an activity in the library called "Cleanup Open Hospital". These are re-usable bot tasks that are shared amongst teams. Another automation developer has already created the necessary cleanup steps, so we don’t need to re-create the wheel!
-
Drag a Bot Task from the BPMN tools menu and place it in the worfklow after the node titled Enter Patient Details
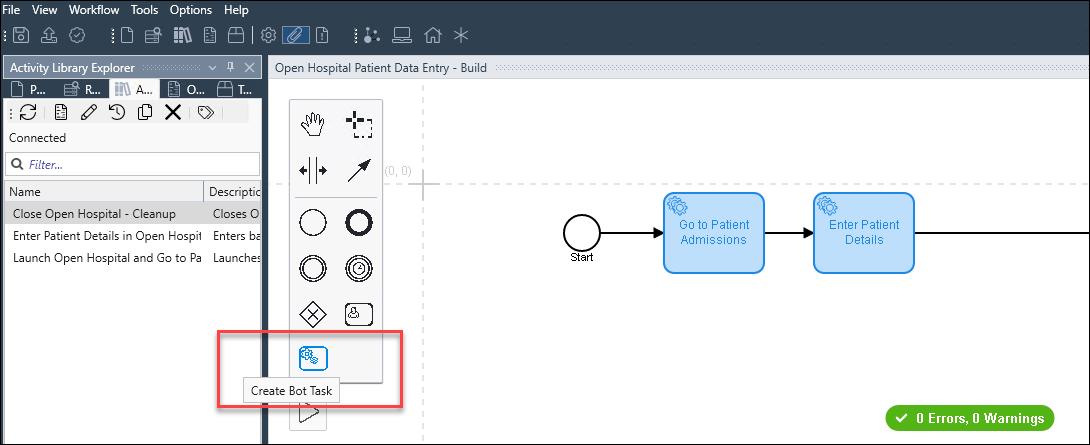
-
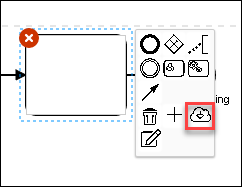
Click on the cloud icon in the pop-up menu next to the new activity to import the activity from the library.
-
In the Activity Library Explorer window that appears, select the activity titled Cleanup Open Hospital, then click Add as a local copy.
-
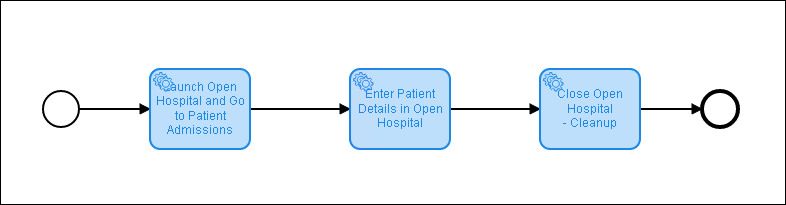
Ensure your BPMN workflow diagram looks like the below before proceeding.
Configure the Robot to Enter Data in Open Hospital
-
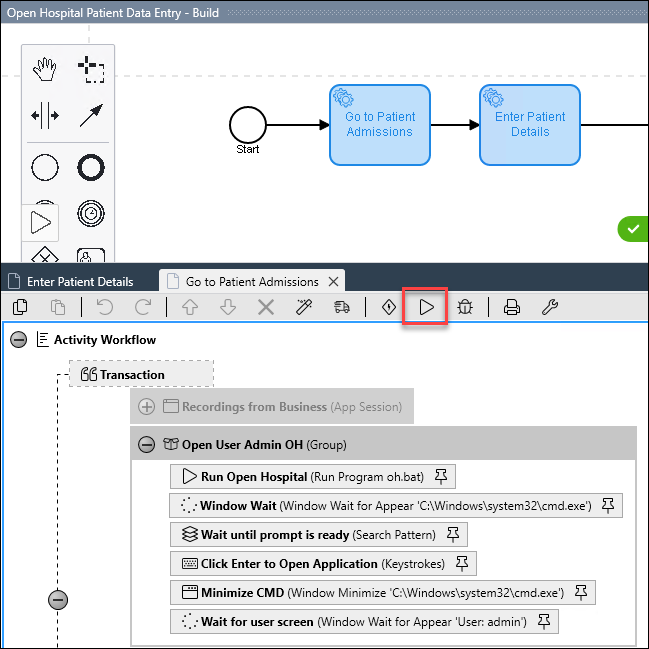
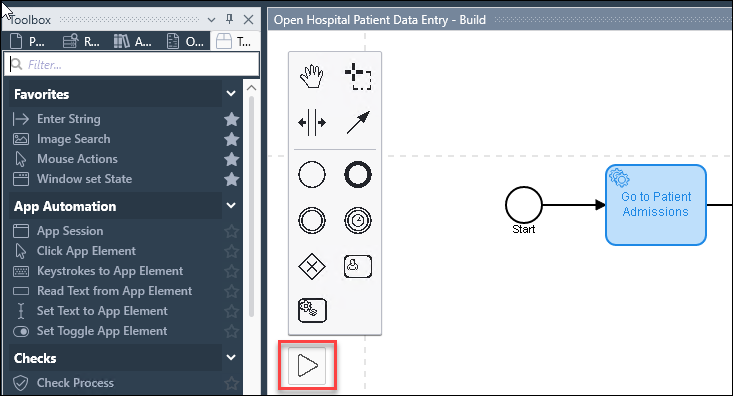
An important part of RPA bot development is to test small sections of the robot as you build it out (otherwise known as unit testing in some cases!). Click the run button that appears in the Acitivity Workflow builder as shown below.
Note: Be sure to click the run icon that appears in the workflow editor - not the run icon in the BPMN diagram window!
Caution: The bot will start running! Be sure not to interrupt its execution by taking your hand off the mouse and keyboard while it runs. Sit back and enjoy the show!
Note: Keep the Open Hospital Application Windows open for the remainder of this exercise! You will need the windows open for RPA Builder to interact with and detect the window elements as you build out new actions.
-
Now that the bot has automatically opened the Open Hospital application and navigated to the patient entry screen, we can start identifying our next steps. Note that the mouse cursor is already in the first name field of the Open Hospital new patient screen - this is important as it tells us we can immediately instruct our robot to start entering the first name with keystrokes once we arrive at this stage in the execution.
-
To do so, double click on the BPMN Node titled Enter Patient Details. This Workflow Editor will load the steps for this node.
-
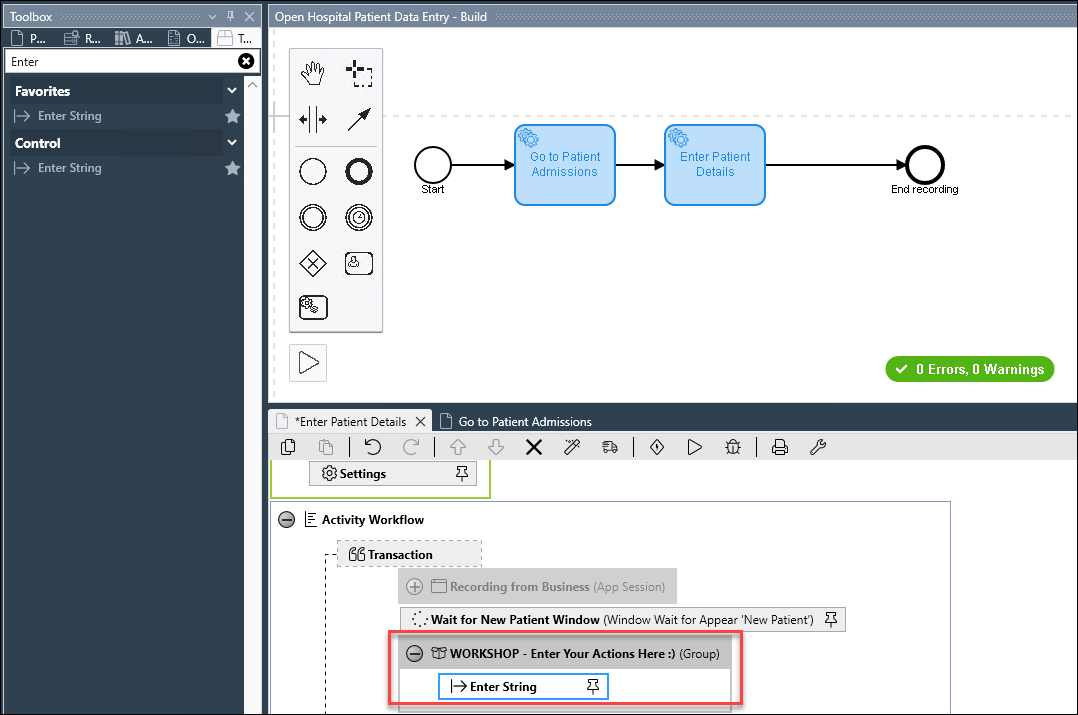
Locate the group container with the title WORKSHOP - Enter Your Steps Here :). This is where you will enter new steps for the bot to execute.
-
Click View > Show Toolbox (Toolbox contains all action steps that you can configure to add logic to the tasks in your process automations. All actions are grouped in different containers)
-
Start by dragging the Enter String action into the group (hint: use the search bar to find the action.) - Enter String Action Step emulates keyboard inputs
-
Double click to open the Enter String configuration wizard.
-
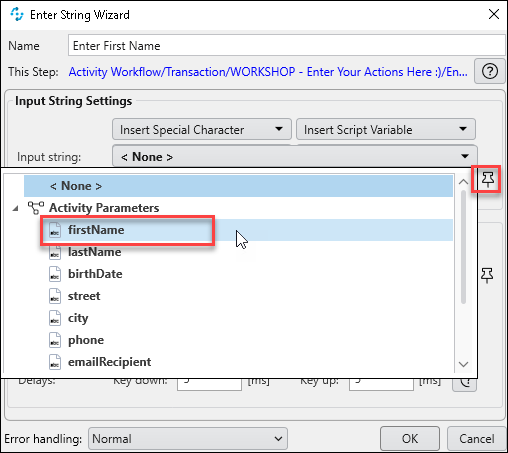
Input Enter First Name in the name field at the top of the wizard.
-
Click the pin icon next to the input string to define the data that will be entered. Select the first name Activity Parameter as shown below.
-
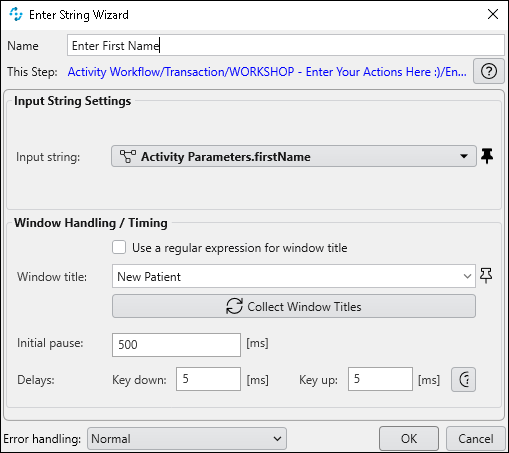
Click Collect Window Titles and select New Patient as the window.
-
If you do not see the window title populated in the drop-down list, it is likely due to the New Patient window not being open. You can quickly correct this by going back to step 1 of this exercise and clicking the run button again to open the Open Hospital application automatically.
-
-
Click OK.
-
-
Our next task is to tell the bot to move to the last name field. One simple way to do this - use the Tab key to move to the next field! We can teach our robot to move between fields the same way users would when iterating through tasks.
-
Search for and drag a Keystrokes action from Toolbox below the Enter First Name action. Double click to open Keystrokes Wizard.
-
Input Tab to Last Name Field in the name field of the wizard.
-
Next, we’ll be able to auto-capture keystrokes performed on an application. Click the Start button in the wizard.
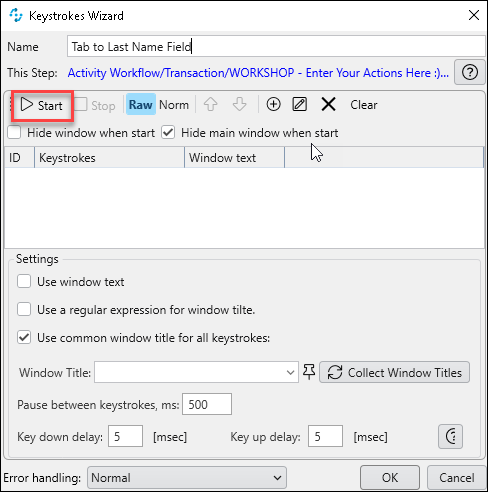
Note: The Builder with automatically minimize so you can place your cursor in an application to auto-capture keystrokes. This is like recording your actions to "instruct" the bot on what to perform!
-
Place your cursor in the first name field of the New Patient window in the Open Hospital Application. Click and drag the keystrokes wizard out of the way if necessary.
-
Hit the TAB key one time on your keyboard to tab down to the last name field. Note that they Keystrokes Wizard automatically picks up the keystroke!
-
Click Stop in the Keystrokes Wizard.
-
Similar to the previous action, click Collect Window Titles and select the New Patient window in the wizard.
-
Ensure your Keystrokes Wizard looks like the below when the Builder maximizes again on the screen.

-
Click OK.
-
-
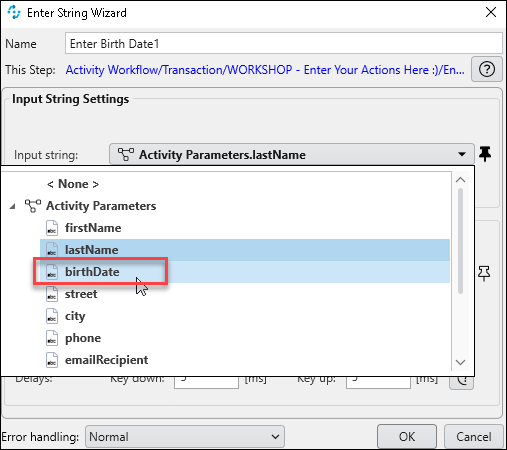
After automating our movement to the Last Name Field, we can use the Enter String action to enter the last name. Follow the same steps as in 2.b and be sure to select the lastName Activity Parameter for the data to enter.
-
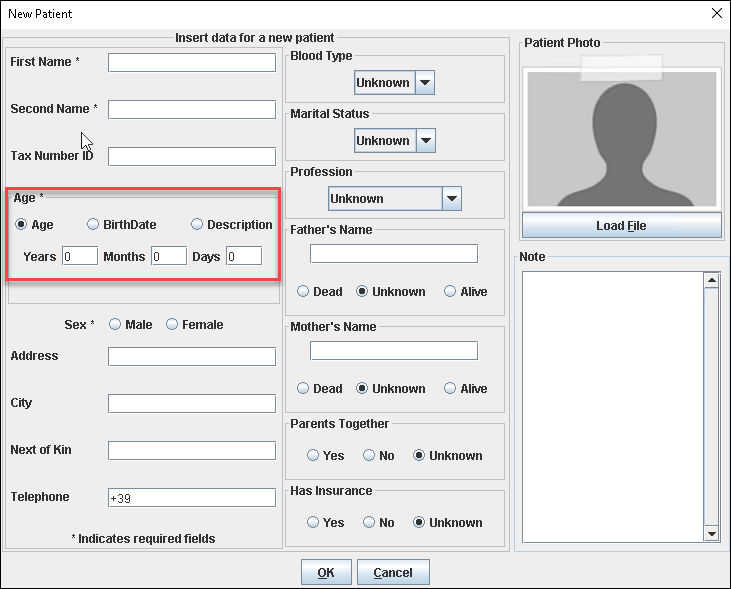
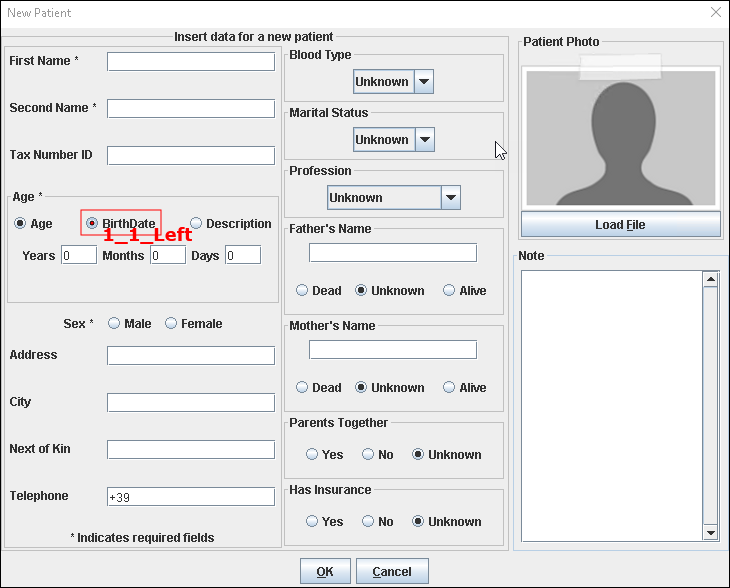
Our final challenge in building out these data entry steps is to input the patient’s birth date. We’ll be able to use similar actions as we did for the first and last name, but there is a curve ball. If we look at the New Patient screen, there is a radio selection that we’ll need to select first. We’ll need to teach the bot to select the BrithDate radio button, and then proceed to input the date.
-
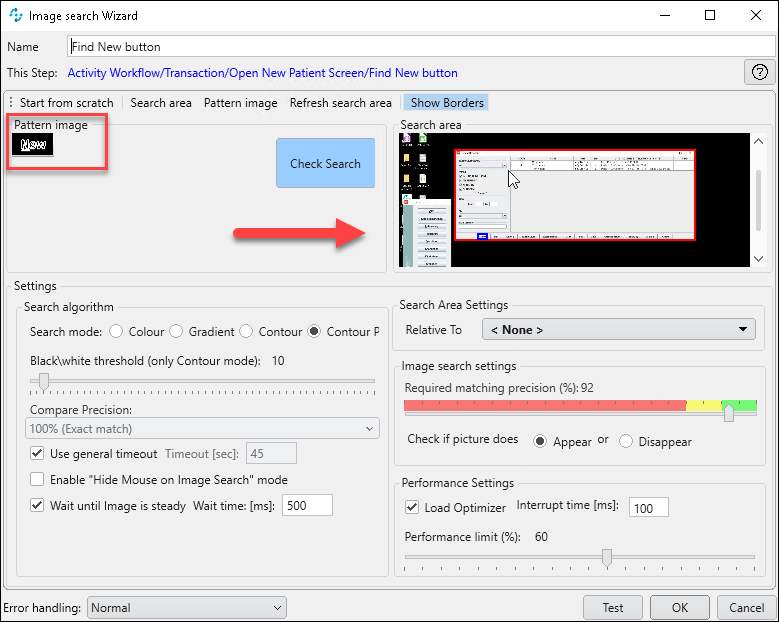
To select the radio, we’ll use Image Search to find the appropriate selection. Drag an Image Search action after the Enter Last Name action.
-
Enter Find BirthDate Radio Button in the Name Field.
-
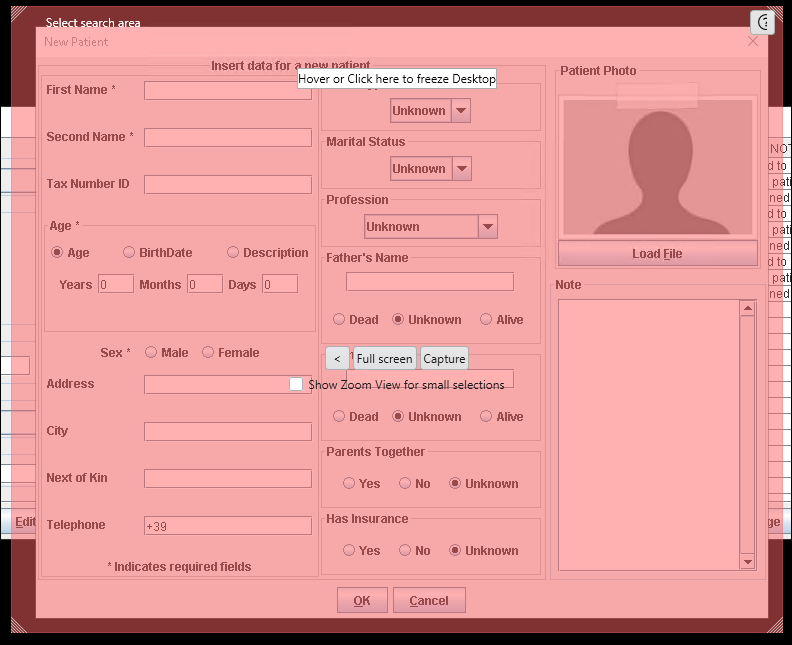
Next, we’ll capture the image we want to find. The Image Search wizard is interactive. The user performs steps to define the search area and the pattern to find. To get started, click Start from scratch.
-
The RPA Builder will minimize. Re-size the purple-colored capture area and move it to be tightly centered on the BrithDate radio button, as shown below. This defines the image that the robot will search for at run time.
-
Click F10 to move on to the next step.
-
Re-size and center the red capture area around the entire New Patient window.
-
Click F10 to complete the configuration of the image search.
-
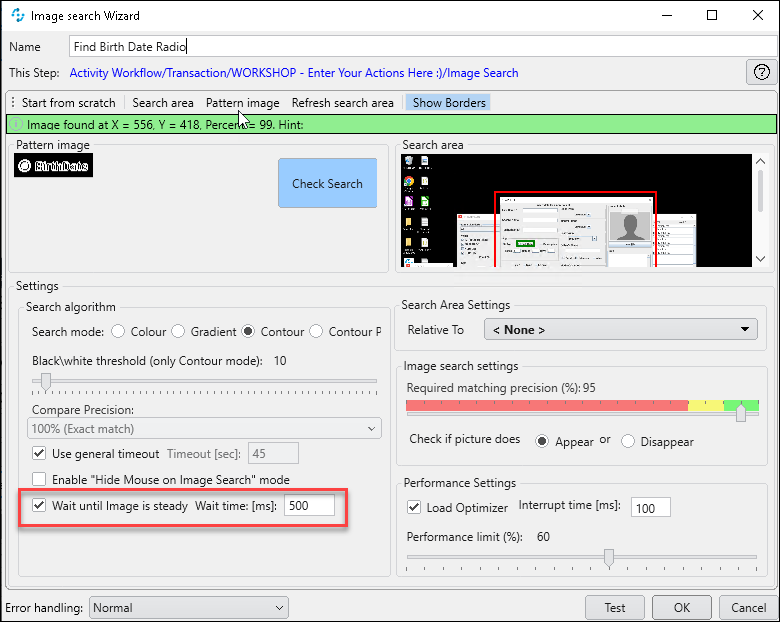
Check the box labeled Wait until image is steady and leave the default value of 500 ms
-
Optionally, you can run a test of the image search by clicking Test. You can verify that the match percentage returned is at least 90 percent.
-
Leave the rest of the settings at their default values and click OK.
-
-
Now that our robot is ready to find the radio button, it will next need to select the radio! The Image Search action returns a set of coordinates based on the image found - these coordinates are passed directly to a Mouse Action step to tell the mous where to click.
-
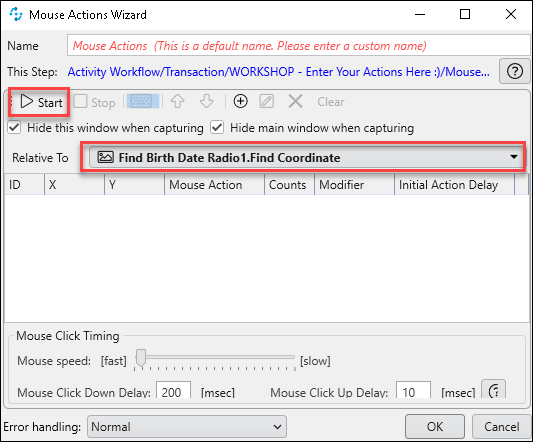
Drag a Mouse Actions step after the Find Birth Date Radio action.
-
Enter Click on BirthDate Radio in the Name field.
-
Note that the Relative To input has already been automatically set to the coordinate result of the previous step! Click Start to begin defining the mouse action to perform. The RPA Builder window will minimize automatically.
-
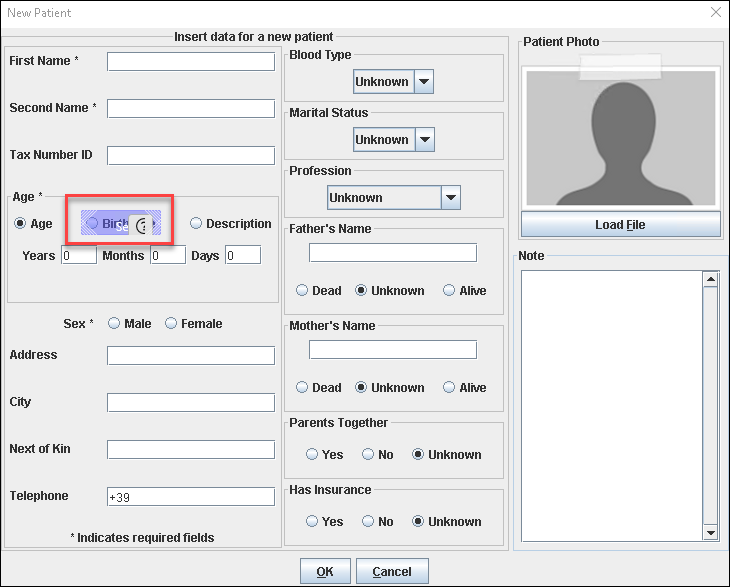
A red outline will appear around the image that was previously defined. Perform one left click directly in the Brith Date radio selection.
-
Hit F10 to go back to RPA Builder.
-
Ensure your Mouse Actions Wizard looks like the below image. If it contains more than the one left click entry, delete any additional mouse actions.
-
Click OK.
-
-
Finally, with the birth date selection made, our robot must navigate to the entry field and enter the birth date.
-
Copy and paste the previous Tab to Last Name Field keystrokes action and place the newly created action after the Click on BirthDate Radio mouse actions step.
-
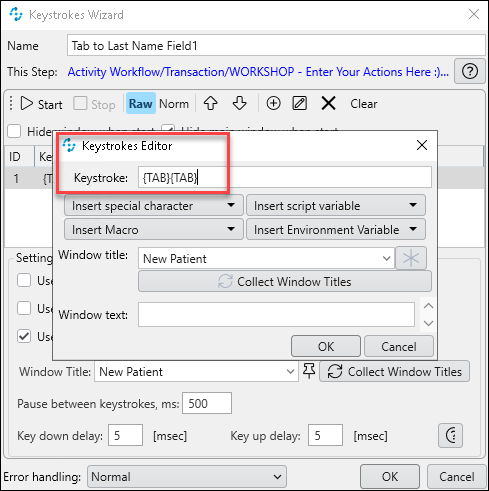
Rename the new Keystrokes action to Tab to Birth Date
-
To navigate to the birth date entry, the robot will need to tab twice. Double-click on the existing {TAB} entry, and duplicate the entry in the editor window that opens - as shown below.
-
Click OK in the Keystrokes Editor window.
-
Click OK in the Keystrokes Wizard to complete the configuration of the keystrokes.
-
Copy and paste the Enter Last Name Enter String action and place it after the Tab to Last Name keystrokes action.
-
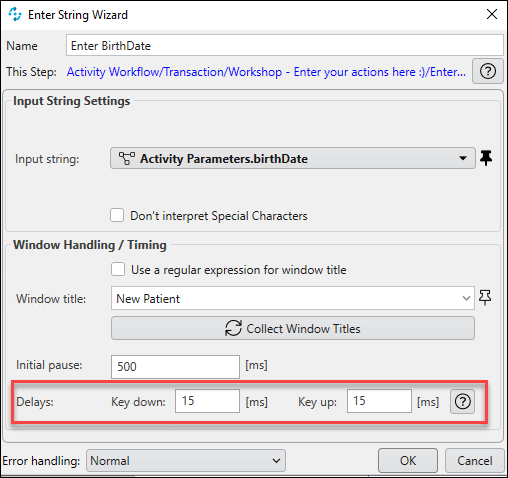
Rename the action to Enter Birth Date
-
Click the Input String dropdown and select the birthDate Activity Parameter.
-
Set the Key down and Key up delay to 15 ms.
-
Leave the rest of the settings untouched and click OK.
-
-
Run a Local Test
Now it’s time to sit back and watch our robot do the tedious work for us! We’ll run a local test next to ensure that what we’ve configured in the process matches how we expect the steps to be performed. Be sure to save any latest changes you’ve made in the RPA Builder.
-
Close the Open Hospital application by closing all open windows except for RPA Builder.
-
Click the Run button that is located in the BPMN process diagram window. This button runs the entire process, rather than a single node.
Remember: While the bot is running, don’t touch the keyboard or mouse! Let the robot do the work!
-
Sit back and bask in the awesome-ness of your robot handling manual tasks for you!
Success!

You have just built and tested an RPA process to automate manual data entry!
What’s next?
With the process complete, it’s important that we run more tests across several scenarios and data sets to ensure maximum reliability of the robot. Not to worry though! RPA Manager has built-in test management to scale testing of your processes.
Move on to Lab 3 to learn how we test and deploy the robots at scale!